with the ferocity of a rabid honey badger, i have just barely snatched this project back from the brink of the abyss known as "projects keight forgot about." (thanks for the patchwork scraps, stupid!).
last thursday, 22 months later, i FINISHED! in this same time frame i could have also fertilized the egg of an african female elephant and loved her through gestation and birth of her elephant...cub? pup? gosling?
i knew it was finally time to finish the quilt when i started feeling like i wanted to change the paint in our living room. see, last summer i added two accent stripes of color (one on each gray striped wall) and i used this fabric line as my color story. i actually took the fabrics themselves to home depot and matched them. so the fact the the paint inspired by the quilt is already seeming old and in need of a change BEFORE i have ever snuggled up under the quilt itself was a red patchwork flag that i needed to [apache] jump on it and complete this queen sized beauty beast.
i opted for a vertical stripe pattern for the backing with a few of my favorite prints from the line and some coordinating solids. i opted to go with a soooper simple quilting pattern of plain rectangles. i HATE the quilting portion of quilts because my machine is tiny and i just really stink at it. i *might* try my hand at free motion, but i just dont know if i can fit in to the big girl panties it would take to try it out! (is it so hard? is it worth it?)
i'm a fuzzy smitten kitten over my woven etsy labels that i commissioned from The East. all my projects now sport one of these bad boys. this is the first one to go on something i made to keep to myself. i feel excited about this.
for some reason my 6th grade class had a unit where we learned how to cross stitch. i have no clue if this was real curriculum or a teacher on the brink (it was in homeroom, not art!). i actually enjoyed it as a school subject for that week, but never stuck with it because, A: it took too long, and B: even in my style-infancy at age 10 i knew that the basic designs available for this medium were butt ugly (my opinion).
now that i am an adult i have a word to put to the style of traditional cross stitch: KITSCH. like grandmas love it and we've all seen it and it's kind of just says "Old Fashioned" to even see something cross stitched these days.
here's a sampling of some of the most "classic" designs that come to my mind when i think cross-stitchery ...along with their real titles and where to buy (dont you dare) and my revised titles.
so imagine my surprise to find myself unwittingly in the needlecraft aisle of Joann this past wednesday, shopping compulsively for a cross-stitch starter kit...for myself! at first i attributed it to the new perfume i bought at banana republic. it smelled delicious on me in the store but when i bought a little bottle and wore it the next day, i kept getting distinct "Nana" undertones from it. like i'd look around for the elderly woman and then realize i was all alone with my granny-smelling wrist (no one else seems to agree with me about this, so i continue to wear it. grammy be thrifty, yall!).
so assuming the "Eau du Nana" did NOT seep into my bloodstream and age my style 50 years, what could have induced such a reversal? lemme tell ya: one single Etsy owner and her gorgeous modern designs! (p.s. this isnt a review and i wasnt given a single thing to write this).
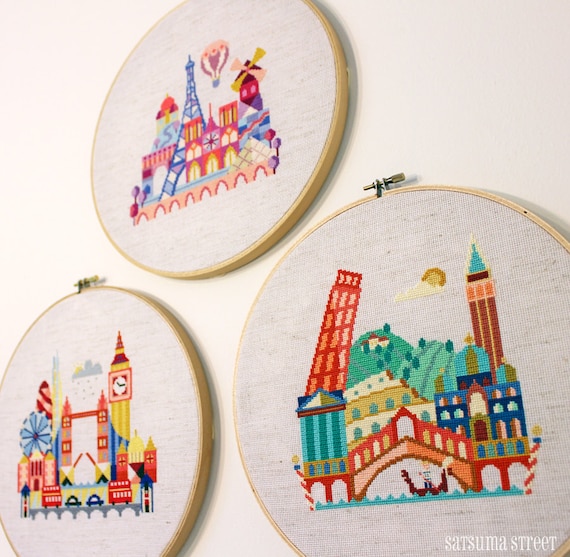
i was gamboling down an instagram rabbity hole, stalking one of my followers when i saw that she had a photo of what i thought at first was a cool graphic print of tokyo. upon closer inspection i was shocked to find that it was cross stitch and that i was NOT repulsed by it! i did a little more digging and turns out this was one of many modern cross stitch patterns by the genius @craftnik who was selling a whole collection at her shop Satsuma Street.
in one fell swoop, this chick changed my perspective on cross-stitch as 100% lame and played out. her colors and designs and the way she displayed them (not a single lace-ruffled padded pillowy sign saying "bless this house" or something of the like) utterly freshened up the entire medium in my eyes and made me actually say I MUST HAVE.
she has a handful of adorable international city designs:
i LOVE the style and colors and knew that it would go perfectly with judah's medieval quilt.
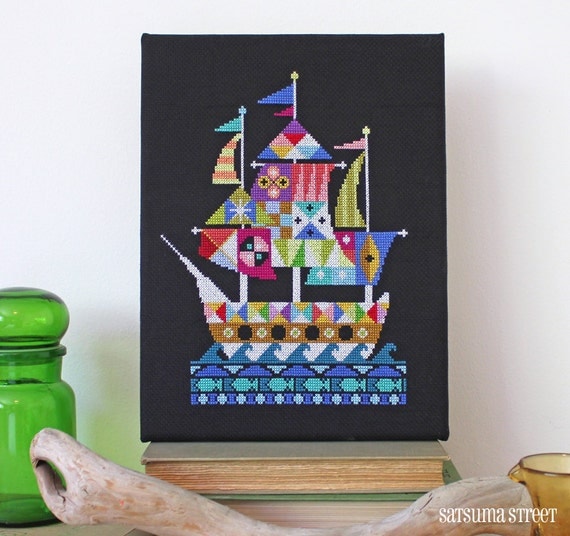
for less than $13 i had everything i needed to finish this project (starting out with NOTHING...sewing and cross stitch dont share a lot of the same tools beyond scissors) and will have tons left over if it catches on. the only thing not reusable was the $4 black cloth background.
another pro: cross stitching takes about 60 seconds to learn. i got a quick run down with great pics from this site.
so the 10 year old keight was definitely wrong about ALL cross stitch being totally not my style. she just hadnt found the right pattern designers. but she WAS right about one thing: it does take forever. it was disillusioning at first for an impetuous, rushy crafter gal like me to have invested about 4 solid hours into something and to only be this far:
and there are tons of mess ups, whatever.
this is definitely not a "I NEED THIS ON MY WALL NOW!" sort of project (though i do!). its a labor of love. i mean youre basically painting a picture pixel by pixel. it's a much more relaxed do-it-while-watching-TV sort of craft than sewing a dress or something (nana would NEVER stitch abe lincoln's face with walking dead on in the background...but i would!) and its definitely more relaxING (balancing out the zombie panic in my psyche). and the type-A excel freak in me adores following a gridded map with color coded legend for where each and every stitch goes. that's just plain yummy.
so i dont know if this is a beginning of a beautiful and long cross stitching romance, but i WILL finish the ship and sail it over to judah's wall. if i do keep churning out this sort of thing, i feel like i have to be careful not to have it be EVERYWHERE in my house, you know? i just dont want people coming in my house and thinking, "THIS CHICK LOVES NEEDLEPOINT!" right off the bat. i'm not that far into my conversion yet.
three cheers for the internet and cool, creative people ransoming an old-fashioned craft and making it blisteringly awesome!
for this fall i got a new fabric supplier and about a million SICK NEW fabrics for my braided scarves. i wanted to expand to be able to accommodate all the different options that people tend to want when they buy scarves to wear to football games, which i had noticed was happening a lot!
TN titans and OU sooners? sure. let's call them that.
with many of my new fabrics just arrived and not even photographed yet, things are very much UNDER CONSTRUCTION still. i am going to reshoot some photos for my etsy shop soon with these new fabrics and some of my hottest friends as models. because i am tired of seeing cruddy photos of myself as my "model."
ay.
but alas, fall is already upon us and football is in full swing, and i gotta get moving .so i'm giving yall a sneaky peaky at some of the new fabrics and possible combos...AND a happy little discount!
*keep in mind: ANY of the fabrics listed in my shop can be combined! i've just put together some examples. arent sure what color combo would be right for your favorite team? just send me a convo and i'll come up with some options.*
i even have a few fabrics that arent even listed yet, so just ask! i'm pretty sure there isnt a pro or college team color combo that i CANT pull off with my stash.
the houndstooth i got almost exclusively for alabama fans. (of course it's also just chic when NOT paired with maroon too!). and i had to lock down an old gold stripe for my alma mater, georgia tech!
i am offering 20% off all braided scarvesin my etsy shop to the first 10 customers to use code TEAMSPIRIT at checkout (and dont forget to leave me your colors!). this is the biggest discount i have ever offered on these babies and they will not be on sale like this again for a while!
scarf 'em up while you can. (oh, my).
update: i have created a titan of a collage with all of the fabrics i will carry. zoom for detail.
lots of people seem to celebrate the beginning of summer. i assume these people are all teachers with really good childcare, models who enjoy wearing less clothing, or folks who dont support an entire herd of mosquitos every time they step outdoors. i am: none of the above.
you know what is something worth putting a celebratory facebook status up for? the start of COLD WEATHER! not only does it mean that my kids (and the scary teenagers *shudder*) are locked back up in their cages of learning, but it is also that magical time of year when there are 3 layers between the general public and my outermost fat roll and cellulite dimple. after 5 months, i can finally stop sucking in...and STOP shaving. PARTY TIME!!!
so with my kids headed back to school next week, and the delicious "-ember" months just around the corner, i decided to host a giveaway celebrating the start of "my" summer. (let's pretend like this is a better time for a beach bag giveaway than the the start of the season).
the winner of this giveaway is gonna get a beach bag in their choice of colors from my insane collection of fabrics, as well as the option of adding a big adorable fabric letter monogram and a zipper closure to the top. that makes this prize worth seventy-five dollars worth of pricelessness (#math).
you have until next thursday night to enter and you can enter LOTS of times. each entry must be verifiable though (like you have to be able to show that you actually did tweet about it, were a FB follower before the deadline etc). the giveaway widget will load in a moment below.
you can leave a comment for fun, but all entries must be made through the rafflecopter helper robot above this section. i'll announce the winner next friday. until then, i'll be sweating, shaving and dreaming of wearing sweatpants 24/7.
eleven months ago, i posted atutorialhere that utterly changed my blogging life. thanks to this scarf capturing the uber-chic style of the inspiration piece, that post caught fire (like a mockingjay, mo-mo fo-fos!) on pinterest and brought lots of DIY'ers here.
i am so thankful because many of those pinny visitors have stuck around and really fanned the flames of my blogging passion with their encouragement and presence.
back at the end of that tutorial, i begged anyone who tried the project to please email me a picture of their finished product. i filed the first few of these away and forgot that i had intended to publish them all at one time.
well i guess i went on an ADD bender and completely forgot (though they kept coming in) for almost a year.
today i rectify that by giddily showing off the work of some amazing sewists, crafters, pinners and DIY'ers.
a few things i noticed:
1. there are 52 pictures here in 4 columns or 13. just like a pack of cards (hence the post title)
2. there are some PRETTY ladies who tried this tutorial.
3. the average DIY'er who tried this is far more creative than me and these ladies showed off so many cool color, fabric (silk! sweaters!), pattern (look for the cool knot changes) and size variations (find the adorable toddler in a baby version!)
aces, every one.
and of course, there are 2 jokers in every pack:
happy anniversary to lena today! (sorry i almost forgot to add you to the pack and that you and dan and [unpictured] elizabeth used the tutorial for your first ever sewing project!)
seeing this makes my heart buzz. if i ever spot one of these scarves on a passerby in the street, i may attack with love and snuggles because that would be simply otherworldly. (who's got my bail money for the day that that happens and i get thrown in the pokey for flagrant groping?).
it's beyond belief that i even get to see these on the internet and to know that the ones i make in my etsy shop (127 so far, i think!) are out there too, being worn by beautiful people all over the country and the world.
the internet can be a discouraging place (my first ever hate-comment was actually last week, on this tutorial), but my experience has been overwhelmingly wonderful and affirming. seeing all of these scarves all together made by so many far-flung hands is one of the coolest bloggy moments i have ever had.
thanks to everyone who has ever tried, looked at, pinned, read, or even just rolled their eyes toward my scarf tutorial post!
and thanks for letting me be sentimental and pollyanna sweet for a moment here...over a scarf.
did any of yall end up here through some internet rabbitty hole with this scarf at the beginning?
*if i somehow left out your picture, send it to me again. and if you never sent one in at first, go ahead and keep them coming! i save ALL of these in a special folder in my email (putapuredukes (at) gmail (dot) com) and will publish every single one that comes in!
here are a million awesome things about our weekend past. with photographic evidence. ready, set go.
jesse and i had a date night thanks to free monthly childcare provide by a local church. we took the van because pimpin' dont take the weekend off, yall.
we had a coupon at dinner and to be able to use it, we had to spend a certain amount. this leads to me + a cocktail. jesse never objects to me getting a drink and him not getting one because i am a massive lightweight who drinks maybe once a month and one good gin & tonic (plus a side of ginger ale to mix into it because i'm classy) makes me handsy, effusive and warm.
mcklayla is not impressed
but i am impressed by her bellying up to a barstool, knocking back a GLASS of OJ and rocking a stately pinky.
i fell deeper in love with this blurry blonde nugget.
i put together another outfit of my own that makes me feel like a million bucks. (and some proof that judah is still existent and beloved).
snapped this GEM of one sassy lady putting out the vibe in her awesome new hand me downs from her buddy reagan.
hung out at the amazing home of an even more amazing family from our church.
the kiddos shockingly shared AND we all got to see judah swim with NO FLOATIE for the first time! (my mom has been teaching him all summer when he stays with my folks, but for obvious reasons, she hadnt video'd it). it was insane to see the little fishy jump off the diving board and motor right over to me on the ladder since he has only ever been in a floatie or our arms in the water. bananas! last year we outsourced potty training to my folks and this year swimming! having teacher-parents is kind of the best. (update: we finally caught it on tape here).
we loved our saturday night hostess's potatopes so much that i made my own version for lunch sunday. this was the entirety of the meal. balance: it's not for everyone.
i had my skype session with my stylist, emily, from Tog +Porter. i am not skype savvy, (for aforementioned reasons of looking like ghostbusters villains on webcam) but i wanted to grab a screen shot of us in action without looking like a creeper--i had no clue how much she could see of what i was doing on my end--so i just blindly and sneakily hit the button once and didnt even check it until afterwards. this beauty was what i captured: both of us looking dubious and scared. dont worry, emily is awesome and i pretty much just want a service (fashion or cosmetic surgery) that makes me look exactly like her. the end.
and this evening we went back to church for the first ever fellowship meal in the new building. there were over 300 people there and it was beyond fun. there were FIVE TABLES of potluck desserts. i had thirdsies. including banana pudding which i usually hate, but was won over by individual chessman cookies on each portion...sweet moses.
layla evaded jesse for a hilarious length of time on this expansive plot of land to the side of the church.
wow. that's a lot of things. no wonder i needed 8 desserts at the end of the weekend..
Want to
see me lose my mind? Give me more than 2 things with straps to carry at one
time.
This always seems to happen at the beach.As I wrangle SPF-greased kids, one of
these strapped vessels will inevitably fall off of my shoulder and land in my
elbow pit. This unforeseen engagement of my meager biceps muscle is what gets
the BP on the rise. While still holding this isometric curl, I swoop down to
stop Layla from eating what appears to be a sand-coated raccoon turd, and my
cross-body cooler bag will ride up and start simultaneously strangling me and
giving me an Indian sunburn that strongly resembles a hickey right on my bright
white neck.
Shortly hereafter I will reach my breaking point, throw
everything off of me like a dog trying to escape from under a blanket you've
hilariously thrown on top of him, sit down on the boardwalk and pout.
Welcome to summertime!
In an effort to NOT end up salting beachfronts and pool
sides everywhere with my bitter, bitter tears, I decided to make myself
a custom beach tote.
The standard one we have counted on for the past 6 summers
was metallic silver with rhinestones spelling out SUPERMODEL and featuring
Heidi Klum’s face on it:
Wait; please let me explain before you judge.
I got it free with a Victoria’s Secret purchase at some
point in my distant and cellulite-free past where shopping there for more than
"one gray cotton bra that I never have to wash, please" was a
reality.
But we all know Heidi is a petite lady. She just can’t hold
a lot. She was great for those carefree DINK days of summer, but, as time went
on, she was maxing out at just our towels and sunscreen, and as we added family
members, ("OKAY! where did all these offspring come from and how do we
stop the flow?!?!), we needed to add extra bags: the cooler bag for snacks and
drinks, a diaper bag, a bag for a dry change of clothes, a toy bag, floats, and
a wet bag.
Surprisingly, the mounting bag-count and ensuing
coat-rack-ed-ness that this trend made me resemble wasn’t enough to clue me in
that maybe we needed a better option. No, no, I just piled more things on
myself in addition to Heidi and took my stress meltdowns in stride, using them
to catch a few extra rays during my sandy pout-sessions until I was ready to
rejoin the group and be liberated from my nylon prison of straps for a few
hours.
No, what finally did send Heidi into full blown retirement
was when I randomly used her as my work bag one week last fall and forgot to
eat the plum that I had packed for a snack. There it stayed until I pulled out
Heidi this spring and found that she had spent the winter as a distillery:
fermenting my forgotten plum into what smelled like purple moonshine. Needless
to say, she was plastered and needed to dry out. But even after that, she was
forever stained and smelly (and just possibly age-inappropriate) so she got
tossed in the "free" pile at ouryard sale.
Now bereft of a bag, it dawned on me that I canin fact sew and maybe I could make a
bag that I really liked: in size and in rhinestone-free-ness. I scoured
Pinterest and got my inspiration fromthis bag,and then Frankenstein-ed it into my
own pattern by adding a lining, changing the dimensions, and adding 7 new
pockets!!!
And so was born the Big Mommy Bag:
this bag is my lover.
6 pockets (2 inside/4 outside), chic cabana-stripe in indigo blue, durable canvas straps, exterior fabric that is stain and water-resistant and fade proof up to 500 hours in direct sunlight. fully lined interior.
and the capacity? ohhhhhhh the capacity!!!!
seriously. ONE BAG FITS ALLLLLLL
so what do you say? you want a tutorial for this bad boy? i got a little ahead of myself and ordered the fabric in 6 25 different colors because i am selling these herein my etsy shop anyway, but if youre into sewing, this would also be a great project even for beginners.
TUTORIAL:
this is a seriously easy and straightforward project. dont be intimidated by the size of the post. i added tons of pictures because i am overprotective of yall that way and want to pamper your with lots of visuals. even the most beginner sewist could handle this project!
SUPPLIES:
-1.5 yds indoor/outdoor fabric for bag exterior. Premier Prints from Fabric.com is hands down my favorite and they have the BEST patterns and prints Thebasic stripe is my fave).
-1.5 yds cotton lining fabric (I use a neutral solid that matches my straps, but go wild!
-2 yds heavy cotton webbing 1.25-1.5 inches wide. This is perfect.
let me warn you: this bag is large and in charge. it totally works for beach and pool, but would look a bit out of place just walking around town. if you want to make a smaller version, go forth with my blessing; the tutorial is exactly the same. you will just need to change the dimensions of your cut pieces. if you like the proportions of my bag, just scale down each of the dimensions by the same ratio (say, 2/3rds of my recommended size) or make up your own! this tutorial will work as long as your matching edges all have partners of the same length.
INSTRUCTIONS:
lay out your fabric. maybe roll around on it because it's so pretty and summery chic:
fold the length of the fabric in half, with right sides together:
* note the asterisk in the picture. this is to show you how my stripes are aligned perfectly among the 2 layers of fabric. this will keep everything nice and square if you are working with stripes.
time to cut your main (exterior/pretty) fabric.
i like to measure out my pieces with my ruler and use a fabric pen to draw my cut lines.
below is the most efficient way i have found to utilize the 1.5 yds. i'm no expert so there may be a better way, but if youre using stripes make sure your side pieces go in an opposite direction from the front, back and bottom pieces (pocket direction doesnt matter because they are square):
ONLY cut where the lines are dotted. do NOT cut along the top edge. you are utilizing the fold and dont want to dissect it. since you are cutting through 2 layers of fabric (except on the bottom piece as noted) these cuts will get you all the pieces you need.
now for your lining fabric you will need the following pieces. since direction doesnt matter at all for the inside, you decide the best cutting layout:
2 front/back pieces @ 24x20
2 side pieces @ 20x10 (what you cut will be 20x5 since youre on the fold but the piece, unfolded will be 10")
1 bottom piece @ 24x10
1 pocket-making piece @ 24x6
outside pockets:
grab your four 10" square pieces of exterior fabric. heat up the iron and fill that trusty spray bottle (note: mine is NOT trusty. it hates me, spits water exactly where i DONT point it and requires 4 pumps to get any water out at all).
spray along the top edge of two of the squares. for a striped fabric, you will want to turn these 2 pieces so the stripes run horizontally. this gives the pocket a nice pop of visual interest against the front & back pieces. if you are using a chevron or busier pattern it might be "too much." something to consider. (look at the 4 bags in the picture at the top...the stripes i turned the pattern direction, but the chevrons i didnt).
fold down about a half inch and press (this thick outdoors material can be hard to get a nice sharp crease out of. dont worry. we will prevail over the fabric soon). set aside
now, on the remaining 2 squares, orient your pattern up and down so its going the same way as your front/back pieces.
spray
fold under a half inch and press. (see how my cuts were insane and uneven in the previous picture? i fixed this hereby folding the edge under and matching up the stripes perfectly to get a square edge.)
now take all 4 of these pieces with the pressed top edges and top stitch about 1/4" away from the fold to cement the finished edge into place (haha! take that unruly fabric!):
set aside 2 of the pocket pieces. if you made them with two different pattern directions like i did, then set aside the ones the run the SAME direction as the front pieces of your bag.
back to the ironing board. dammit.
fold the remaining 3 raw edges under 1/2":
uppity fabric resisting the press again. its okay as long as youve put a good visible crease in there.
now i will show you 2 ways to do the pocket corners:
METHOD ONE (fold then cut): spray the ever living mess out of one corner because we want this fold to count:
fold one of your bottom corners up at a 45 degree angle. you want this diagonal edge to be about 2 inches:
PRESS IT IN PLACE!
now you have this:
to get the edges perfectly symmetrical, fold the other side over so the sides match up:
and the fold back the remaining corner so that the angle matches up:
spuh-ray and press
in the words of the esteemed rufio: bangorang.
trim the folded under corner of down to about 1/2 so that you arent reaching in your pocket and feeling something tickle you and thinking its a roach wing:
i about died trying to look normal holding scissors in place with my left hand for 5 seconds. my right brain almost melted.
so this is what you have:
and that little piece of junk thinks it can boss us around by not laying flat. we'll see about that.
METHOD TWO (cut then fold) for pockets:
using the handy dandy lines that come on your cutting board:
line up your two squares so that the bottom right edges hang over 2 inches below and to the right of the 45 degree line (you can do these 2 at a time):
using your ruler right along the line and a rotary cutter, cut those corners with the precision of an experienced rabbi:
then you will spray and press all around the raw edges, folding under 1/2 inch. even if you use this method, the fabric shant obey. dont take it to heart. our day is coming.
now we take our revenge:
position your pocket in a friendly location on your front and back pieces (lay them so that the longest edge is horizontal and the shorter on is vertical. it should be wider that it is tall). a nice and centered pocket feels good to my heart:
pin down around the edges to affix those pressed creases into place. enjoy shoving the sharp objects through the disobedient folds:
take the pinned pieces to you machine and sew around the 5 pinned sides. back stitch a few times at the beginning and end to tack your pocket down well at a place that will receive the most stress:
then stitch all the way down in a digital U shape (dont sew your pocket closed!)
and if your NOT like me, you amight be OCD and like snipping your threads before moving forward. do that now, weirdos. i like to wait until the end and then get allll the loose threads:
this photo is staged. done believe i actually did it
hooray! a FUNctional pocket is complete. let's whisper into it how many fun things will go inside of its shady climes: fruit snacks, ipads, sunscreen, books, dirty diapers!!
hahahaha type-A people, more loose thread whiskers!
repeat for the other pocket and front/back piece
now grab those other two pocket pieces that we laid aside, and get your 2 side pieces (10x20) too. you are going to align the bottom raw edges with right sides facing up:
again, my cuts are a bit ragged, but i just make sure my stripes are parallel or perpendicular where needed, and all is right.
pin in place:
repeat for both pockets and side pieces
now the stage is set to construct the bag:
*&#@%REMEMBER THIS LOCATION FOR LATER*&#@%
take one side piece (with pinned pocket) and one front/back piece and line them up along one raw edge, right sides facing. pin in place making sure your pockets open to the same UP direction:
sew or serge along the dotted line, at about a 1/2 inch seam allowance (remove the pins before serging. yikes!)
repeat for the other pair of side/front pieces (line it up the EXACT same way as you did before).
so now you have 2 of these:
making sure your pockets are all pointed in the same direction (seriously, i have done this wrong and felt a FOOL!) put one of these side/front pieces atop the other, right sides facing, matching up raw edges.
pin in place:
i need to shave my arms. this is what the inside will look like when pinned.
sew or serge these last 2 edges.
turn inside out and get really fluttery about what you've made so far:
now we attach the bottom. its tricky to explain, but really pretty easy to do:
lay your bottom piece (24x10) in front of you:
yes, i was in my bathrobe
put the main body section on your lap, right side up with the pocket opening toward you:
flip the bottom piece down onto your lap, on top of the main section, aligning the bottom raw edges of the bottom piece and one of the bottoms of your front/back piece and making sure right sides are facing:
match up the corners of both pieces:
even given the fact that you main piece has been sewn and has a seam, when you pull it taut, the lengths should match perfectly since the are the same (24"):
pin in place:
start in the middle of the long side you just pinned. sew with a 1/2" seam allowance:
stop when you are about 1/4" from the end, and then backstitch to 1/2" away from the edge:
.make sure you need is down here:
lift your pressor foot and rotate just the top piece of fabric (which is the bag bottom) so that the short edge that WAS perpendicular to the edge you just sewed is now lined up with it:
rotating to meet:
this may create some bunchiness, but that's okay, just shove it as neatly as possible under the pressor foot as you start back up, now sewing the short side of the bottom of your bag:
i made a video of this process that may end up making you more confused or giving you seasickness because i video'd with one hand while sewing with just my left hand. this is tricky enough two-handed and i may have even made it look harder than it is, but it might help you realize that there is some turning and a bit of shoving that can go into this part (it is a 3-way seam, after all) and still be okay:
repeat this method for all 4 corners.
if you have a serger, i find it's easier to just run 4 straight lines of stitching aronud the perimiter , crossing over the previous line to ensure full closure, rather than pivoting on a sewing machine.
either way, flip your bag inside out and check on your sexy corners.
blammo
and oh, baby, this is now officially a bag. though we arent finished, it does technically satisfy the definition of "a bag."
ok now we are going to do pretty much the exact same thing for the lining with just a few tweaks.
take your 24x6 piece of lining fabric and lay it on your ironing board. we are going to make four 5" square pockets the fastest way i know how.
*note, if you want to add more pockets, less pockets, smaller pockets, bigger pockets GO FOR IT. make your dream bag. just follw the same procedure outlined below to get the size you want. (finished size will be about an inch smaller vertically and horizontally than the rectangle you cut to begin with)
spray it like it's a girl with daddy issues on spring break. (dont worry, she'll find jesus in her senior year and go on to marry a great guy).
fold down the top and bottom long edges and press. about 1/2 inch:
thats funny, i dont remember drinking before i ironed. dont fear. your creases will be more sober.
now topstitch along 1/4" from the fold of JUST ONE of these creases. all the way along the side:
on your cutting mat, cut the long strip into four 6-inch wide sections:
back at the ironing board, take each of your 4 rectangles and spray and press under the 2 remaining raw edge sides.
you will now have four 5" squares with all their edges folded under and the top edge stitched down:
grab your two front/back lining pieces and position and pin your pockets where you'd like them (again, freestyle this mofo and put them wherever you want. you can put them on the interior sides if you'd prefer, do just one big centered pocket...whatever gets your motor running):
now sew the pockets on in the same U route you did before, backstitching at the beginning and end of each pocket:
repeat for all of your pockets.
now you are going to construct the lining JUST like you did the exterior: sides to main pieces and then sew those 2 pairs together and then the bottom nonsense. (see above where all the crazy (*&#@%) characters are for a refresher)
a lining sack:
this is getting spine-tinglingly awesome, no?
time to add the straps!
cut 2 one yard pieces of heavy cotton webbing:
Oh, hi. this is what 50 yards looks like. yours will likely be smaller.
Take each of your yard-long sections of webbing and pin them with raw edges lined up to the top of the bag like so:
i've found that running the straps along the side of the main pocket leaves them at a really good width for carrying and it centers them as well. make sure youre straps arent twisted when you pin them in place.
repeat for the other side of the bag too.
now leave your exterior right side out, and flip your lining inside out. take the exterior and slide it inside the interior (aka, pockets will be facing):
shimmy it down in there all the way:
this is kind of sad because your pretty exterior fabric is getting eaten by the less exciting lining. dont worry. beautiful regurgitation is impending and the exterior will come out just as sparkly and debonair as lando calrissian did after his emergence from the great sarlacc of tatooine.
twist and rearrange things so that all the seams line up exterior to interior and pin each of the main seams in place:
i also pin in the middle of the long side so that it's not flapping in the wind. i also add another pin through the exterior/interior/straps to keep them well in place.
starting on one of the side pieces, backstitch and then sew all the way around the top raw edges of the bag:
stop sewing and backstitch when you cross over the 4th side seam, leaving about a hand's width gap turning. you want to make sure you have sewn over all 4 straps:
*in this pic my gap is between the straps, but the gap works better on the side as described
now the magic. reach inside the opening (all your pins better have been removed!!) and grab the bottom of the bag and pull it all out through the opening:
this is the best part of sewing for me. i cant help but feel like i have just successfully executed a transfiguration spell when this beauty springs forth from that little opening:
this is what we have now. our bag and attached lining with our hands-width gap still open.
stuff the linig into the exterior:
at this point there is probably urine everywhere because you have peed your pants with excitement over how awesome this project is turning out. or is that just me and my weak pelvic floor?
use your fingers to fold under the unfinished edges in the gap area so that it looks just like the rest of the sewn perimeter. starting there, topstitch around the entire top of the bag about 1/8" from the top seam. this will not only close the turning gap but also reinforce your straps and give the bag a crisp finished look:
and just like that...BIG MOMMY BAG RISES!!!!
run promptly to your nearest body of water. feel free to carry everything you own because you now have room for it. make one for everyone mom you know within 1 miles. you are mommy. you are hero:
leave me any questions you may have in the comments section and i will try my best to answer them all.
again, if you're a lover not a fighter or a buyer not a sewer...you can just buy one of these bags from me in one of 30 fabrics HERE.



.JPG)


.JPG)